|
|
Post by nyarlathotep333 on Jul 19, 2020 4:13:15 GMT
What I would do is find a rigged skeleton model; I just ran a quick search for free skeletons in Turbosquid, there seems to be some available that are pre-rigged in Blender format (although come to think of it, a skeleton doesn't really need to be rigged as it it doesn't need to deform, though it does of course make it easier): www.turbosquid.com/Search/3D-Models/free/skeleton. Posing pre-rigged models isn't too hard, there's videos on how it works and I can give you some tips to get you started. You could then get it printed by a printing service like Shapeways, although if it's just a few human-sized skeletons then I don't mind printing it for you on my resin printer. My current selection of resins is a bit limited, but I do have a "clear" resin - it's actually slightly yellowish, but it should be fine if you slap on a blue or green glaze or something, which I figure you want to do anyway. I also have opaque white and black resins if needed. Hmmm, that's an intriguing thought. It looks like most of the 'free' downloads actually cost a fair bit, but there's one that might work OK. I found another that's not rigged as well on another site...haven't tried doing anything with either file yet. The only issue with printing is I'm not sure how many I would want printed. I know (vaguely) where I want them, but getting the poses to match up with the base might be tricky without being able to fit them as I go...clear skeleton spirits would be pretty cool though. Also, how hard would it be to have parts of their bodies 'fading' like in the art? Sculpting-wise I'm envisioning on this first one the suggestion of hip bones, fading into a 'trail' that would connect on the base, similar to this (quick & not very good) sketch:  |
|
|
|
Post by Soul Samurai on Jul 19, 2020 6:47:48 GMT
FYI it's possible to import videogame models into Blender for 3D printing; I usually use XPS files, but I believe it's possible to work with SFM files as well. Of course videogame models tend to be lower resolution, adding details to textures instead of the geometry, but if it's just skeletons it should be fine. But yeah, you have a wider range of models to search from that way.
The skeletons are kind of floating anyway right? Basically you glue them onto the base with clear plastic rods, then cover that up with clear resin "ectoplasm". Or carve at the base to modify it as needed. Or model up a vague proxy of the base (or a new base to print) so you can pose the models around it before printing them, but that's rather a lot of work.
As for the "blending the skeleton to a vapour trail" part, if I've correctly understood what you want to do, my knee-jerk solution would be to use gradients in the glazes to "fade out" the skeleton and "fade in" the vapour trail: so the skeleton is glazed so that the head and body has more coats of colour and it gets transparent towards the feet, then apply coats of lightly coloured resin that get thicker towards the feet so that the legs fade into the vapour. If that makes sense?
I'm assuming that the ectoplasm smoke will be manually applied and not 3d printed, to get more depth. I feel that's easier and would look better.
|
|
|
|
Post by Soul Samurai on Jul 19, 2020 6:54:39 GMT
|
|
|
|
Post by nyarlathotep333 on Jul 21, 2020 8:21:56 GMT
An update on the delay...
My dad is in town and staying with us for a few weeks - this happened somewhat last minute so I haven't had any time to do any more work on the base.
I am still trying to figure out Blender...it's a bit more complex than I had thought. I found a skeleton model (https://www.turbosquid.com/3d-models/body-skeleton-blend-free/659093) that I'm experimenting with, and I think I've figured out 'how' to move the various bones, but it's weird working in three dimensions when I'm rotating/dragging things around and I'm not always happy with the results...lots of CTRL-Z and starting over so far. Also, whenever I try and bend his spine so he's more hunched over, it tends to distort the ribcage too much. I'm still trying to get his upper body into a position I like...not even gonna worry about having his legs 'fade' into a spectral trail yet. That part will come.
I think I'm also going to finish the sculpts as well - in case I can't get the 3D stuff figured out to my satisfaction. I may try casting them in clear resin at some point as well, though I still haven't found a clear resin that I have been able to use effectively - I don't have a degassing chamber or pressure pot so bubbles have been a major issue with the clear resins I've tried in the past.
|
|
|
|
Post by Soul Samurai on Jul 21, 2020 12:02:03 GMT
Yeah, Blender's skeletal animation system takes a bit of getting used to. I like to rely mainly on just rotations; so clicking on a bone and pressing "r" to rotate. Just FYI you can lock rotations and other transforms to specific axis by pressing the corresponding keyboard key ("x" for the x axis, etc). Press once to lock to the global coordinate system axis, press twice to lock to the local coordinate system axis.
|
|
|
|
Post by nyarlathotep333 on Nov 3, 2020 1:54:54 GMT
A quick update: Soul Samurai provided me with some superb 3D printed skeletons to use as spirits (THANKS Soul!). The resin prints were pretty fragile, and I had planned on coating them with resin or water effects to strengthen them and make them look more spirit-like. After a few failed attempts, I managed these. They aren't really how I pictured them in my head, but they might do OK. I still have a few of the prints left that I might experiment with, but for now I'll see how they look once I've got the DJ painted up. Speaking of, painting is coming along...I'm not a very fast painter though. I'll update here when I can. *EDIT* The blue I used to highlight the bones looks a bit darker here than it actually is, though definitely a darker shade than in the photos. I'm hoping that I didn't make them too dark though.  |
|
|
|
Post by Soul Samurai on Nov 3, 2020 10:33:53 GMT
Interesting, they do look a bit dark. You might want to try watering the glaze down with a bit of medium? Tbh I was expecting you to go with white and then a coloured "aura" around them in tinted resin.
I'm wondering if a brighter drybrush would perhaps give them a bit of lightness while maintaining a degree of ghostly transparency - if you think of the Ghostbusters movies for example, the brighter parts of the ghosts are more visible and the darker parts more transparent, perhaps drybrushing could create a similar effect? Something to try on the damaged test pieces perhaps.
I'm interested in seeing the results of any experiments you try, even the failures.
|
|
|
|
Post by nyarlathotep333 on Nov 4, 2020 2:39:16 GMT
Interesting, they do look a bit dark. You might want to try watering the glaze down with a bit of medium? Tbh I was expecting you to go with white and then a coloured "aura" around them in tinted resin. I'm wondering if a brighter drybrush would perhaps give them a bit of lightness while maintaining a degree of ghostly transparency - if you think of the Ghostbusters movies for example, the brighter parts of the ghosts are more visible and the darker parts more transparent, perhaps drybrushing could create a similar effect? Something to try on the damaged test pieces perhaps. I'm interested in seeing the results of any experiments you try, even the failures. Yeah, you're thinking along the same lines as I am now. In fact, when I was checking the status of an order on Amazon I saw (in my recommended stuff) some really neat looking glow paint that I think I'm going to try and use that on some of the white skeletons and then use some turquoise dye to slightly tint the resin. I like how these look - just that they're too dark. They would probably look pretty slick against a light background. When I was working on them, I had thought they would work out better, and am now kicking myself a bit for using all four poses instead of waiting to see the results on just one. No worries, for the luminous paint, the opaque white skeletons hopefully will work well. |
|
|
|
Post by nyarlathotep333 on Dec 15, 2020 2:17:58 GMT
Quick update: with the holidays and end of the kids' school semester upon us I haven't had as much time (not that I have a lot to begin with!) so I'm not as far along as I would like to be on this project. I'm a slow painter as well so the DJ model has the main areas of black armor done - starting on the brass next. I'm debating on whether I should try my hand at NMM (something I haven't really done in the past) or just plow on ahead with my usual metallics.
I did get some of the skeles done in light blue resin - they look pretty cool, and a lot better than the other ones do. I'm going to put together a few more, and I glued some of the individual skulls to fishing wire which I'm going to give the same treatment once I figure out how to pose the fishing line the way I am envisioning it. I'll try and get some photos of those posted soon.
*EDIT: Fixed typo
|
|
|
|
Post by marxlives on Dec 16, 2020 20:42:38 GMT
This is impressive work.
|
|
|
|
Post by nyarlathotep333 on Jan 18, 2021 11:25:02 GMT
So I've been struggling with this mini a bit...sometimes a mini just comes together, but other times it just doesn't seem to want to gel. This is the latter. I tried making the reflections similar to the artwork but failed miserably - it always just looked like random paint instead of reflection. I repainted the black areas and tried again, this time making it the reflection more streamlined and stylistic. I am not 100% pleased with the results - I like some of the areas on the arms, but the main cowling area looks...I dunno, off somehow. I'm looking for people's opinions about whether I should keep it, redo it, rework it somehow, etc. Still to do on the main 'Jack: 'steel' areas, highlighting on the brass areas, glow and OSL. 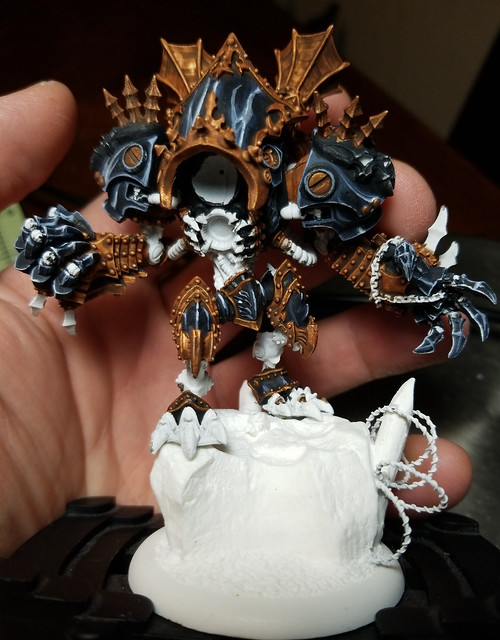 |
|
|
|
Post by Soul Samurai on Jan 18, 2021 12:39:15 GMT
The colours look really cool, really deep colour and great contrasts. The grey details on the hull are visually pleasing, but they don't exactly read as reflections. Which is not surprising because the thing about reflections is that how they look is entirely dependent on the viewing angle, so it feels nigh impossible to me to make reflections that look good outside of very staged situations on very specific models. And of course right now we can't see what it's supposed to be reflecting, and what it's reflecting is not a recognisable form, which makes it read even less as a reflection. But like I said, I do think the detail looks visually pleasing, so I don't know if it's better to keep it or not.
|
|
|
|
Post by tiberius on Jan 18, 2021 13:34:26 GMT
Personally, I think that is coming along great! I love the color scheme and the greyish hues coming out against the dark steel. Like Soul Samurai said, its not really a reflection, but more indicative of spirits floating or infusing around it.
|
|
|
|
Post by nyarlathotep333 on Jan 20, 2021 8:54:50 GMT
Thanks guys, I appreciate the insight. Some of the issue for me is that I'm painting this one in pieces with the arms and head not attached - it's hard to visualize exactly where reflections are going to be coming from, especially as I've not completely decided exactly where the spirits are going to be placed around the base and model. I'm still working that out in my head, though I've got some ideas formulating.
I think I'm going to leave it as-is for now and concentrate on getting the brass highlights put in and adding the steel and some of the detailing. Once that's done I can attach the arms and head which should give me more of an idea where everything is going to fit. Perhaps I can revisit reflections then, or just leave it as is...I'll probably decide that once I reach that point I guess.
|
|
|
|
Post by Soul Samurai on Jan 20, 2021 9:13:06 GMT
So... have you considered magnetizing the head and maybe one hand?
|
|