


Post by faelin on Mar 8, 2017 5:57:31 GMT
I've been trying to take time to think about what each one of my units can do whenever I add them to one of my lists. I've started typing or writing them down, since it forces me to slow down and think deeper about it. Is its really that much faster then the average heavy? How does its damage potential actually compare? Etc. My hope is that when it comes time to table the models, I'll overlook my options less and make fewer silly mistakes.
I started with the Manticore, since I am just currently painting my second one and often run one in my lists. Please let me know if I've missed anything or you have other tricks that I don't know about.
Manticore

This is the first heavy warjack most new retribution players will ever pick up. Having been in both the mark II and mark III starter boxes, there are few retribution players who don't have one. The Manticore is the the king at being the disposable 'jack of all trades, master of none'.
Stats and Abilities
Shields: Yes
As with any Shyeel designed jack, the Manticore has a above average speed for a heavy. Meaning its probably faster then your opponent's heavies, but its not a sure-fire garuntee. Its point cost makes the the second cheapest heavy in the retribution arsenal. So if it gets destroyed by a mistake, you wont feel it as much as you would other warjacks. It also makes it easier to add several of these to a list, in case you're short on points and still need more heavy warjacks.
Its pow + str isn't everything you've dreamed of, but by spending a single focus, you can boost it with +3 str for a turn. When you stack that with other support like an anarchist damage buff and/or Helynna, its damage can get frighteningly high. Remember that both of its wrist blades leave it with open hands. That combined with the ability to spend a focus point to boost its strength gives some nice throwing options.
The Manticore also comes with a decent gun that has a variable number of shots. This can be useful in a pinch, but varying number means you'll never know how much work you're going to get done until after you declare your ranged attack and target. I've found myself using it before, when I can't get into melee or don't want to, but melee will always be the Manticore's main priority.
My favorite ability of the Manticore is the ability to place wall templates. Anything that moves through or ends its activation in the wall template takes a decent pow damage roll. These can be great for blocking charge lanes or placing on already engaged enemy troops.
In the end, while its doesn't specialize at anything, the price tag, flexibility, and abilities rate it high in my book.
Strategy:
Hammer And Anvil:
The Manticore's wall template only causes damage if a model moves through it or ends its activation in it. Thus, normally, placing it directly on top of an enemy unit has no effect. They'll simply activate and move out, without triggering a damage roll. However, if its placed on top of an already engaged enemy model, you leave your opponent two options. Either he moves out of the wall template, and triggers a free strike from your unit that is currently engaging him. Or he kills the unit that it engaging him, forcing him to end his activation inside the wall template, thus triggering a damage roll.

Blocking Change Lanes:
In the below scenario we see an enemy squad is flanking around our main front line and going for our juicy ranged units in the back. By placing a wall template we've forced them to either take massive casualties if they charge, or try to go around the template. If they have the distance to make it around the template (which is questionable), they'll at the lost their bonus charge damage. Most likely you'll have prevented the enemy from engaging your ranged units for an entire turn.
![]()
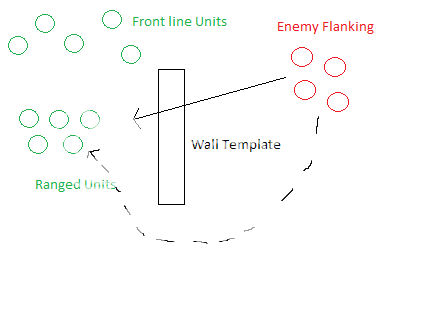
This can be a great tactic if you find that your front lines aren't going to get the alpha strike on your enemy. Even though retribution units can be quite speedy, there will be times where the enemy front line is going to get their charge off first. Rather then taking crippling loses, using wall templates can easily make them take as many losses passing their it during their charge, as you take from their charge.
Two Manticores cranks this tactic up to an 11.
Throwing The Game:
With two open hands, your going to get 2d6 dice to oppose your opponents 1d6 dice. Combine this with a decent strength score(which you can boost higher with focus), means that you can make throws with a fairly high certainty. This has the potential for knocking down enemy models and not only causing damage, but knocking them down to allow easier hitting.
Maximizing Damage:
By using the strength boost, empower, and either a charge or a boosted damage roll, you'll be hitting at Pow + Str + 5, with three dice. Combine that with Hand of Destruction or Ravyn, and you'll be adding another dice.
If you estimate each dice you roll at 3.5 additional average damage, once you've made your two inital attacks, you'll have turned a profit by boosting your strength instead of buying another dice. Plus, since their not mutually exclusive, you could in theory do both.
Here are some damage estimates against enemy armor ratings. Please note that this is based on the assumption that your attacks will hit. For high defense enemies, boosting damage will provide a better value, since you'll likely be having to boost to hit.
Armor 10 foe:
-Best approach is to buy attacks
-60 boxes a round
Armor 15 foe:
-Best approach is to buy attacks
-35 boxes a round
Armor 20 foe:
-Best approach is to boost his strength and then buy attacks
-20 boxes a round
Armor 25 foe:
-Boost damage and Strength
-7 boxes a round
Synergy:
Any Melee Unit:
Any melee unit works well with the Manticore. The above tactic of placing your wall template on top of engaged enemies can give your melee units an edge in battle. In addition, the ability to screen the Manticore can help ensure you always get the damage from a charge.
If you find your melee unit is far cheaper, but outclassed by some of your enemy's units, use the wall template to force a trade. Engage them and then drop the template directly on top of them. They'll have to decide between triggering the template or suffering an attack of oppertunity, and the boosted damage roll on AoO can let you hit above your weight class.
Arcanist Mechanik:
You should take three. Really. This guy can give extra focus to your 'jacks and boost their melee damage. This is all on top of being able to repair. At their cheap point cost, there's no reason not to take the FA.
Lys Healer:
Preventing knockdown and the ability to remove debuffs makes the Lyss healer a good friend to the Manticore. Since you can't attach soulless to Manticores, these gals(or are they guys) can save your day. Nothing hurts worse then spending your turn due to being crippled by debuffs.
Manticores:
These guys work great in pairs. The ability to place two wall templates can't be overstated. One is an annoyance for your enemy. Two of them, that can ruin entire enemy battle plans.
Helynna:
She gives the Manticore everything it wants. The ability to ignore crippled systems, fully regenning its shields, increasing its damage with Hand of Destruction, additional protection from ranged attacks, boosting its movement via rhythm of war.... Everything. Her force grip can even set up charges and in a pinch, she can repair!
Ossyan:
The ability to block charge lanes is always appreciated when you have a largely ranged list. In addition, the Manticore can potentially put out three shots. Which can be nice in its own right. You'll need to ask yourself how often it wouldn't just be better to walk into melee, but its still an option. The double open hands also helps you get off throw attacks in order to knock down targets. This can help ranged units with poor accuracy.
Ravyn:
The automatically boosted melee damage is always nice for the Manticore. That, combined with pathfinding she brings to the table can help open up some deadly charges. While the feat wont be a big bonus for the Manticore most games, there will be a few edge cases where you could take advantage of them. Works, but probably not my first choice in Jack for her.
-Elara2:
The Manticore, like many melee jacks enjoy the armor cracking that Elara gives, as well as her ability to pass out Boundless Charge and Ghostly. While not necessarily the first jack I would take with her, the Manticore still benefits from her boosts.
Sample List:
Helynna
-Sylys
-Discordia
-Manticore
-Chimera
Arcanist Mechanik x3
Heavy Rifle Team x2
Lys Healer
Dawnguard Sentinels
-UA
-Soulless
Dawnguard Invictors
-UA
-Soulless
I started with the Manticore, since I am just currently painting my second one and often run one in my lists. Please let me know if I've missed anything or you have other tricks that I don't know about.
Manticore
This is the first heavy warjack most new retribution players will ever pick up. Having been in both the mark II and mark III starter boxes, there are few retribution players who don't have one. The Manticore is the the king at being the disposable 'jack of all trades, master of none'.
Stats and Abilities
Shields: Yes
As with any Shyeel designed jack, the Manticore has a above average speed for a heavy. Meaning its probably faster then your opponent's heavies, but its not a sure-fire garuntee. Its point cost makes the the second cheapest heavy in the retribution arsenal. So if it gets destroyed by a mistake, you wont feel it as much as you would other warjacks. It also makes it easier to add several of these to a list, in case you're short on points and still need more heavy warjacks.
Its pow + str isn't everything you've dreamed of, but by spending a single focus, you can boost it with +3 str for a turn. When you stack that with other support like an anarchist damage buff and/or Helynna, its damage can get frighteningly high. Remember that both of its wrist blades leave it with open hands. That combined with the ability to spend a focus point to boost its strength gives some nice throwing options.
The Manticore also comes with a decent gun that has a variable number of shots. This can be useful in a pinch, but varying number means you'll never know how much work you're going to get done until after you declare your ranged attack and target. I've found myself using it before, when I can't get into melee or don't want to, but melee will always be the Manticore's main priority.
My favorite ability of the Manticore is the ability to place wall templates. Anything that moves through or ends its activation in the wall template takes a decent pow damage roll. These can be great for blocking charge lanes or placing on already engaged enemy troops.
In the end, while its doesn't specialize at anything, the price tag, flexibility, and abilities rate it high in my book.
Strategy:
Hammer And Anvil:
The Manticore's wall template only causes damage if a model moves through it or ends its activation in it. Thus, normally, placing it directly on top of an enemy unit has no effect. They'll simply activate and move out, without triggering a damage roll. However, if its placed on top of an already engaged enemy model, you leave your opponent two options. Either he moves out of the wall template, and triggers a free strike from your unit that is currently engaging him. Or he kills the unit that it engaging him, forcing him to end his activation inside the wall template, thus triggering a damage roll.
Blocking Change Lanes:
In the below scenario we see an enemy squad is flanking around our main front line and going for our juicy ranged units in the back. By placing a wall template we've forced them to either take massive casualties if they charge, or try to go around the template. If they have the distance to make it around the template (which is questionable), they'll at the lost their bonus charge damage. Most likely you'll have prevented the enemy from engaging your ranged units for an entire turn.
This can be a great tactic if you find that your front lines aren't going to get the alpha strike on your enemy. Even though retribution units can be quite speedy, there will be times where the enemy front line is going to get their charge off first. Rather then taking crippling loses, using wall templates can easily make them take as many losses passing their it during their charge, as you take from their charge.
Two Manticores cranks this tactic up to an 11.
Throwing The Game:
With two open hands, your going to get 2d6 dice to oppose your opponents 1d6 dice. Combine this with a decent strength score(which you can boost higher with focus), means that you can make throws with a fairly high certainty. This has the potential for knocking down enemy models and not only causing damage, but knocking them down to allow easier hitting.
Maximizing Damage:
By using the strength boost, empower, and either a charge or a boosted damage roll, you'll be hitting at Pow + Str + 5, with three dice. Combine that with Hand of Destruction or Ravyn, and you'll be adding another dice.
If you estimate each dice you roll at 3.5 additional average damage, once you've made your two inital attacks, you'll have turned a profit by boosting your strength instead of buying another dice. Plus, since their not mutually exclusive, you could in theory do both.
Here are some damage estimates against enemy armor ratings. Please note that this is based on the assumption that your attacks will hit. For high defense enemies, boosting damage will provide a better value, since you'll likely be having to boost to hit.
Armor 10 foe:
-Best approach is to buy attacks
-60 boxes a round
Armor 15 foe:
-Best approach is to buy attacks
-35 boxes a round
Armor 20 foe:
-Best approach is to boost his strength and then buy attacks
-20 boxes a round
Armor 25 foe:
-Boost damage and Strength
-7 boxes a round
Synergy:
Any Melee Unit:
Any melee unit works well with the Manticore. The above tactic of placing your wall template on top of engaged enemies can give your melee units an edge in battle. In addition, the ability to screen the Manticore can help ensure you always get the damage from a charge.
If you find your melee unit is far cheaper, but outclassed by some of your enemy's units, use the wall template to force a trade. Engage them and then drop the template directly on top of them. They'll have to decide between triggering the template or suffering an attack of oppertunity, and the boosted damage roll on AoO can let you hit above your weight class.
Arcanist Mechanik:
You should take three. Really. This guy can give extra focus to your 'jacks and boost their melee damage. This is all on top of being able to repair. At their cheap point cost, there's no reason not to take the FA.
Lys Healer:
Preventing knockdown and the ability to remove debuffs makes the Lyss healer a good friend to the Manticore. Since you can't attach soulless to Manticores, these gals(or are they guys) can save your day. Nothing hurts worse then spending your turn due to being crippled by debuffs.
Manticores:
These guys work great in pairs. The ability to place two wall templates can't be overstated. One is an annoyance for your enemy. Two of them, that can ruin entire enemy battle plans.
Helynna:
She gives the Manticore everything it wants. The ability to ignore crippled systems, fully regenning its shields, increasing its damage with Hand of Destruction, additional protection from ranged attacks, boosting its movement via rhythm of war.... Everything. Her force grip can even set up charges and in a pinch, she can repair!
Ossyan:
The ability to block charge lanes is always appreciated when you have a largely ranged list. In addition, the Manticore can potentially put out three shots. Which can be nice in its own right. You'll need to ask yourself how often it wouldn't just be better to walk into melee, but its still an option. The double open hands also helps you get off throw attacks in order to knock down targets. This can help ranged units with poor accuracy.
Ravyn:
The automatically boosted melee damage is always nice for the Manticore. That, combined with pathfinding she brings to the table can help open up some deadly charges. While the feat wont be a big bonus for the Manticore most games, there will be a few edge cases where you could take advantage of them. Works, but probably not my first choice in Jack for her.
-Elara2:
The Manticore, like many melee jacks enjoy the armor cracking that Elara gives, as well as her ability to pass out Boundless Charge and Ghostly. While not necessarily the first jack I would take with her, the Manticore still benefits from her boosts.
Sample List:
Helynna
-Sylys
-Discordia
-Manticore
-Chimera
Arcanist Mechanik x3
Heavy Rifle Team x2
Lys Healer
Dawnguard Sentinels
-UA
-Soulless
Dawnguard Invictors
-UA
-Soulless


